Category: Uncategorized

  • The Ultimate Guide to Choosing a Business Email Service

    The Ultimate Guide to Choosing a Business Email Service

    Your email address is often the first point of contact between you and your customers. An email like contact@yourcompany.com doesn’t just send messages—it builds trust, reinforces your brand, and serves as the digital cornerstone of your professional identity. But with countless options available, how do you choose the right one?

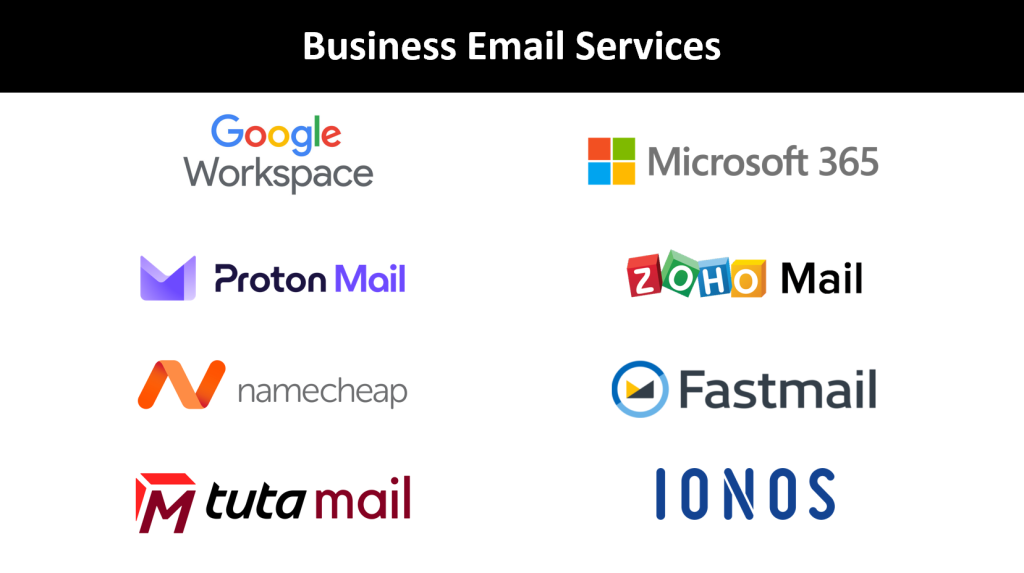
    Whether you’re a solopreneur who just needs a professional address or a growing team that requires a full productivity suite, this guide will walk you through everything you need to know. We’ll explore the different categories of services, analyze the key players, and provide a clear decision framework to help you make the best choice for your business.
    business-email-service

    Quick Decision Framework

    Start Here: Answer these three questions to narrow your options immediately:

    1. What’s your primary need?
      • Just want professional email → Consider email forwarding or basic hosting
      • Need team collaboration → Look at Google Workspace or Microsoft 365
      • Maximum security/privacy → Consider Proton Mail or Tuta
      • Tight budget → Start with Zoho Mail or your domain registrar
    2. What’s your team size?
      • Solo or 1-2 people → Email forwarding, Zoho, or basic providers
      • 3-25 people → Google Workspace, Microsoft 365, or Zoho
      • 25+ people → Enterprise plans from Google or Microsoft
    3. What’s your monthly budget per user?
      • $0-1 → Zoho Mail, email forwarding, or registrar email
      • $1-5 → Namecheap, IONOS, Fastmail, or Tuta
      • $5-10 → Google Workspace or Microsoft 365
      • $10+ → Enterprise solutions or premium security providers

    Essential Features to Evaluate

    Before diving into providers, understand what separates a good business email service from a great one:

    Core Requirements

    • Custom Domain Support: The non-negotiable foundation—you must be able to use @yourdomain.com
    • Reliable Uptime: Look for 99.9% uptime guarantees
    • Mobile Access: Responsive webmail and dedicated mobile apps
    • IMAP/POP Support: For using your preferred email client

    Security & Privacy

    • Two-Factor Authentication (2FA): Essential for protecting accounts
    • Spam & Virus Filtering: Should be included and effective
    • SSL/TLS Encryption: Standard for data transmission
    • End-to-End Encryption: Advanced security for sensitive communications
    • Data Location: Important for compliance and privacy laws

    Collaboration & Productivity

    • Shared Calendars: For team scheduling and meeting coordination
    • Contact Management: Shared address books and contact syncing
    • File Sharing: Cloud storage integration or built-in sharing
    • Video Conferencing: Integrated or seamless third-party options
    • Shared Inboxes: For customer service and team email management

    Technical Considerations

    • Storage Capacity: From 1GB to unlimited—match your needs
    • Attachment Limits: Typically 25MB, but some offer more
    • API Access: For integrating with other business tools
    • Migration Tools: For moving from your current provider
    • Backup & Recovery: Protection against data loss

    The Categories of Business Email Services

    1. All-in-One Productivity Suites

    Best for: Teams that need comprehensive collaboration tools

    These platforms offer tightly integrated ecosystems combining email, productivity apps, and collaboration tools. They’re ideal for businesses wanting a single platform for most operations.

    Google WorkspaceMost Popular

    • Best For: Businesses of all sizes prioritizing collaboration and cloud-native workflows
    • Strengths: Intuitive interface, excellent real-time collaboration, robust Gmail, reliable uptime
    • Key Features: Professional Gmail, Google Drive, Docs/Sheets/Slides, Meet, Calendar, shared inboxes
    • Storage: 30GB to unlimited depending on plan
    • Pricing: Business Starter ($6/user/month), Business Standard ($12/user/month), Business Plus ($18/user/month)
    • Ideal If: Your team collaborates on documents, needs video conferencing, or wants the most user-friendly experience

    Microsoft 365Enterprise Favorite

    • Best For: Companies already using Microsoft products or preferring desktop applications
    • Strengths: Powerful desktop apps, excellent enterprise features, deep integration with Windows
    • Key Features: Outlook email, OneDrive, Word/Excel/PowerPoint, Teams, SharePoint
    • Storage: 1TB OneDrive per user plus email storage
    • Pricing: Business Basic ($6/user/month), Business Standard ($12.50/user/month), Business Premium ($22/user/month)
    • Ideal If: You use Office applications heavily, need advanced enterprise features, or have Windows-centric workflows

    2. Privacy-Focused & Independent Providers

    Best for: Security-conscious users who want to avoid big tech

    These providers prioritize privacy, security, and user control over data, often with innovative features and transparent policies.

    Proton MailMaximum Security

    • Best For: Journalists, lawyers, activists, and businesses handling sensitive information
    • Strengths: Swiss privacy laws, end-to-end encryption, zero-access encryption
    • Key Features: Encrypted email, encrypted calendar, VPN included, self-destructing emails
    • Storage: 1GB to 500GB depending on plan
    • Pricing: Free plan available, Mail Plus ($4/user/month), Business ($6.99/user/month)
    • Ideal If: Privacy is your top priority, you handle sensitive data, or you distrust big tech

    FastmailClean & Fast

    • Best For: Users wanting a premium, ad-free experience without complexity
    • Strengths: Lightning-fast interface, excellent search, strong privacy, no ads
    • Key Features: Clean webmail, calendar, contacts, file storage, masked email addresses
    • Storage: 2GB to 100GB depending on plan
    • Pricing: Basic ($3/user/month), Standard ($5/user/month), Professional ($9/user/month)
    • Ideal If: You want a premium email experience without the complexity of productivity suites

    Tuta (formerly Tutanota) ⭐ Budget Security

    • Best For: Privacy-conscious users on a tight budget
    • Strengths: German privacy laws, end-to-end encryption, post-quantum cryptography
    • Key Features: Encrypted email/contacts/calendar, open-source, quantum-resistant encryption
    • Storage: 1GB to 1TB depending on plan
    • Pricing: Free plan available, Revolutionary ($3/user/month), Legend ($8/user/month)
    • Ideal If: You want maximum security at a low cost

    3. Budget-Friendly & Value Options

    Best for: Startups, small businesses, and cost-conscious users

    These services offer excellent value, providing professional email capabilities without breaking the bank.

    Zoho MailBest Free Option

    • Best For: Startups and small businesses wanting professional email at minimal cost
    • Strengths: Generous free plan, comprehensive business app ecosystem, good features
    • Key Features: Ad-free interface, mobile apps, calendar, tasks, notes, CRM integration
    • Storage: 5GB (free) to unlimited (paid)
    • Pricing: Free (up to 5 users), Mail Lite ($1/user/month), Mail Premium ($4/user/month)
    • Ideal If: You’re just starting out, have a small team, or want to test business email features

    Namecheap EmailSimple & Affordable

    • Best For: Individuals and small businesses wanting no-frills email hosting
    • Strengths: Very affordable, easy setup, reliable hosting company
    • Key Features: Basic webmail, spam filtering, mobile access, email forwarding
    • Storage: 3GB to unlimited depending on plan
    • Pricing: Private Email ($1.98/month for first year), Professional Email ($4.98/month)
    • Ideal If: You want simple, reliable email without extra features

    IONOSBudget Champion

    • Best For: Extremely budget-conscious users needing basic professional email
    • Strengths: Rock-bottom pricing, often includes free domain, solid basics
    • Key Features: Webmail, mobile apps, spam protection, SSL certificates
    • Storage: 2GB to 50GB depending on plan
    • Pricing: Mail Basic ($1/month first year), Mail Business ($4/month)
    • Ideal If: Budget is your primary concern and you need basic functionality

    4. Email Forwarding Services

    Best for: Solo users who just need to receive emails professionally

    Perfect if you only need to receive emails at your custom address and can reply from your existing personal email account.

    Cloudflare Email RoutingMost Reliable

    • Best For: Users already using Cloudflare for DNS
    • Strengths: Free, reliable, easy setup, excellent deliverability
    • Features: Unlimited forwarding, catch-all addresses, routing rules
    • Pricing: Completely free
    • Ideal If: You use Cloudflare and just need to receive emails

    ImprovMXEasiest Setup

    • Best For: Users wanting the simplest email forwarding solution
    • Strengths: Super simple setup, works with any registrar, reliable
    • Features: Email forwarding, aliases, simple dashboard
    • Pricing: Free (basic), $9/month (premium features)
    • Ideal If: You want the easiest possible setup for email forwarding

    Comprehensive Comparison Table

    ProviderBest ForKey StrengthsStorageStarting PriceFree Option
    Google WorkspaceTeams & collaborationUser-friendly, excellent collaboration30GB+$6/user/monthNo
    Microsoft 365Enterprise & Office usersPowerful desktop apps, enterprise features1TB OneDrive$6/user/monthNo
    Zoho MailSmall businessesGenerous free plan, business app ecosystem5GB+$1/user/monthYes (5 users)
    Proton MailPrivacy & securityEnd-to-end encryption, Swiss privacy1GB+$4/user/monthYes (limited)
    FastmailPremium email experienceFast, clean, ad-free2GB+$3/user/monthNo
    TutaBudget securityEncryption, privacy, low cost1GB+$3/user/monthYes (limited)
    NamecheapSimple & affordableLow cost, reliable hosting3GB+$1.98/monthNo
    IONOSUltra-budgetCheapest option, basic features2GB+$1/monthNo
    Email ForwardingReceive-only needsFree, simple setupN/AFreeYes

    Step-by-Step Decision Guide

    Step 1: Check Your Domain Registrar First

    Before exploring other options, check what your domain registrar offers:

    • GoDaddy: Professional Email plans starting at $5.99/month
    • Namecheap: Private Email starting at $1.98/month
    • Google Domains: Includes email forwarding, paid plans available
    • Hover: Email forwarding included, hosted email available

    Why start here? It’s often the easiest setup and may be bundled with your domain at a discount.

    Step 2: Assess Your Business Needs

    For Solo Entrepreneurs:

    • Just need professional receiving address → Email forwarding
    • Need to send professional emails → Zoho Mail (free) or Namecheap
    • Handle sensitive information → Proton Mail or Tuta
    • Want premium experience → Fastmail

    For Small Teams (2-10 people):

    • Basic email needs → Zoho Mail or registrar email
    • Need collaboration → Google Workspace Business Starter
    • Microsoft-centric → Microsoft 365 Business Basic
    • Privacy-focused → Proton Mail Business

    For Growing Businesses (10+ people):

    • Heavy collaboration → Google Workspace Business Standard
    • Enterprise features → Microsoft 365 Business Premium
    • Budget-conscious → Zoho Mail Premium
    • Security-critical → Proton Mail Professional

    Step 3: Consider Your Technical Requirements

    Integration Needs:

    • CRM system → Check provider’s integration marketplace
    • Existing Microsoft tools → Microsoft 365 is the natural choice
    • Google tools → Google Workspace integrates seamlessly
    • Custom business apps → Look for API access and third-party integrations

    Security Requirements:

    • Basic business needs → Any reputable provider will suffice
    • Client confidentiality → Consider Proton Mail or Tuta
    • Compliance requirements → Check provider’s compliance certifications
    • Advanced security → Look for advanced threat protection features

    Step 4: Trial and Test

    Free Trials Available:

    • Google Workspace: 14-day free trial
    • Microsoft 365: 30-day free trial
    • Zoho Mail: Free plan for up to 5 users
    • Proton Mail: Free plan with limited features

    What to Test:

    • Interface usability and speed
    • Mobile app functionality
    • Email delivery reliability
    • Integration with your existing tools
    • Customer support responsiveness

    Migration Tips and Best Practices

    Planning Your Migration

    1. Inventory Current Setup: List all email accounts, aliases, and forwarding rules
    2. Backup Important Emails: Export critical emails before switching
    3. Plan Downtime: Schedule migration during low-activity periods
    4. Test Thoroughly: Set up one account first to test all features

    Migration Tools

    • Google Workspace: Built-in migration tools for most providers
    • Microsoft 365: Migration wizards and professional services
    • Third-party tools: MigrationWiz, BitTitan for complex migrations
    • Manual methods: IMAP copying for smaller migrations

    Post-Migration Checklist

    • Test email sending and receiving
    • Verify mobile app functionality
    • Update email signatures
    • Configure spam filters
    • Set up auto-responders if needed
    • Train team on new interface
    • Monitor for delivery issues

    Common Pitfalls to Avoid

    Pricing Traps

    • Promotional pricing: Many providers offer steep first-year discounts that expire
    • Hidden fees: Setup fees, migration costs, or premium support charges
    • Per-feature pricing: Some providers charge extra for basic features
    • Annual commitments: Monthly pricing is often significantly higher

    Feature Limitations

    • Storage limits: Make sure limits match your actual usage
    • Attachment sizes: Standard is 25MB, but some providers offer less
    • API restrictions: If you need integrations, verify API access
    • Mobile limitations: Some providers have limited mobile functionality

    Security Oversights

    • Weak passwords: Use strong, unique passwords for admin accounts
    • No 2FA: Always enable two-factor authentication
    • Unsecured integrations: Verify third-party app security
    • No backup plan: Have a plan for data recovery

    Frequently Asked Questions

    Can I change providers later?

    Yes, but it requires planning. Most providers offer migration tools, and email data can typically be exported and imported. However, changing can be disruptive, so choose carefully initially.

    What if I need more storage?

    Most providers offer easy upgrades to higher storage tiers. Cloud-based providers like Google Workspace and Microsoft 365 offer virtually unlimited storage on higher plans.

    How important is email uptime?

    Very important for business continuity. Look for providers with 99.9% uptime guarantees and good track records. All major providers listed here meet this standard.

    Can I use my existing email client?

    Yes, most providers support IMAP/POP access, allowing you to use Outlook, Apple Mail, Thunderbird, or other clients. Some budget providers may charge extra for this feature.

    What about spam filtering?

    All reputable providers include spam filtering, but effectiveness varies. Google Workspace and Microsoft 365 have excellent spam protection, while smaller providers may be less sophisticated.

    Final Recommendations

    Best Overall: Google Workspace

    For most businesses, Google Workspace offers the best combination of features, usability, and reliability. It’s particularly strong for teams that collaborate frequently.

    Best Value: Zoho Mail

    The free plan is genuinely useful for small teams, and paid plans offer excellent value with comprehensive features.

    Best for Security: Proton Mail

    If privacy and security are paramount, Proton Mail’s end-to-end encryption and Swiss privacy laws make it the clear choice.

    Best Budget Option: Email Forwarding + Personal Email

    For solo entrepreneurs just starting out, email forwarding combined with a professional signature on your personal email can be a viable interim solution.

    Best for Microsoft Users: Microsoft 365

    If you already use Office applications or have Windows-centric workflows, Microsoft 365 provides seamless integration.

    Conclusion

    Choosing the right business email service is a foundational decision that impacts your brand credibility, team productivity, and operational efficiency. The key is matching your specific needs—whether that’s collaboration, security, budget, or simplicity—with the right provider.

    Start with the quick decision framework at the beginning of this guide, then dive deeper into the options that match your requirements. Remember that you can always start small and upgrade as your business grows. The most important step is moving away from generic email addresses to something that reflects your professional brand.

    Your email address is often the first impression you make on clients and partners. Make it count by choosing a service that not only handles your mail reliably but also empowers your business to communicate professionally and efficiently.
  • The Stair-Step Method: A Proven Path to Bootstrap Success (And Why Most Founders Skip the Wrong Steps)

    The Stair-Step Method: A Proven Path to Bootstrap Success (And Why Most Founders Skip the Wrong Steps)

    A deep dive into Rob Walling’s time-tested approach to building sustainable businesses—and the critical insights modern bootstrappers are missing.


    Back in 2009, serial entrepreneur Rob Walling started noticing something interesting. As he watched hundreds of bootstrappers through his podcast Startups for the Rest of Us, MicroConf, and TinySeed, a clear pattern emerged among those who actually succeeded in replacing their income and quitting their jobs.

    Most advice tells you to go big or go home. Build the next unicorn. Disrupt entire industries. But Walling’s data told a different story—one that contradicts much of today’s startup mythology.

    In his seminal essay The Stair Step Method of Bootstrapping, Walling laid out what he calls “a repeatable path with a higher-than-normal success rate” for bootstrapping yourself to freedom. Nearly a decade later, this framework remains one of the most practical roadmaps for founders who want to build sustainable businesses without external funding.

    But here’s what’s fascinating: most entrepreneurs today are still doing it backwards.

    stair-step-method-bootstrap-business-without-funding

    The Three-Step Framework That Actually Works

    Walling’s stair-step method breaks down into three distinct phases, each building on the previous one:

    Step 1: Your First Product – Start with something simple in an existing ecosystem
    Step 2: Own Your Time – Scale or replicate until you can quit your job
    Step 3: Recurring Revenue – Build the standalone SaaS or subscription business

    The counterintuitive insight? You should not start with that ambitious SaaS idea burning in your brain.

    Step 1: Embrace the “Unsexy” Beginning

    Walling’s first recommendation flies in the face of startup culture: don’t build a standalone SaaS product first. Instead, start with something that feels almost embarrassingly small.

    WordPress plugins. Shopify apps. Heroku add-ons. Photoshop plugins. Even ebooks or courses.

    These aren’t the projects that land you on TechCrunch, but they have three critical advantages:

    1. Built-in discovery through app stores and marketplaces
    2. Lower complexity in both building and marketing
    3. Faster path to profitability with smaller upfront investment

    The psychology here is crucial. Your first product isn’t about building your dream company—it’s about learning the fundamental skills of product creation, marketing, and customer acquisition without the crushing weight of trying to revolutionize an industry.

    bootstrapping-business-growth

    Step 2: The Patience to Stack Success

    Here’s where most founders make their biggest mistake: they abandon what’s working to chase something bigger.

    Walling advocates for either growing your first product to full-time income levels or—more commonly—stacking multiple small wins together. Dave Rodenbaugh built three WordPress plugins before moving to SaaS with Recapture. Phil Derksen combined Pinterest Pin it Pro and Stripe Checkout Pro for WP to quit his job.

    This isn’t about lacking ambition. It’s about understanding lifetime value (LTV) and matching your marketing approach to your product’s economics. When you’re selling something with an LTV of $10-15, you can’t make paid advertising work. But when you stack three of these together, you create the financial foundation to take bigger risks.

    Step 3: The Recurring Revenue Payoff

    Only after securing your time and building your skills should you tackle that standalone SaaS product. By this point, you have:

    • Proven product development skills
    • Marketing experience across multiple channels
    • Financial runway to experiment
    • Mental confidence from previous successes

    Walling’s own journey illustrates this perfectly. His revenue chart shows clear jumps at each step transition, ultimately leading to Drip, which he sold for eight figures.

    how-to-find-niche-saas-ideas

    Why This Framework Matters More Than Ever

    In today’s startup environment, the stair-step method feels almost radical in its pragmatism. While Twitter is full of founders raising seed rounds for ideas scribbled on napkins, Walling’s approach suggests a different path: build your way up through competence and cash flow.

    The Modern Bootstrapper’s Dilemma

    Today’s founders face unique challenges that make the stair-step method even more relevant:

    Information Overload: With every growth hack and marketing channel documented online, it’s tempting to try everything at once. Walling’s advice to master one traffic source first is more valuable than ever.

    SaaS Saturation: The recurring revenue model is so well-known that every category is crowded. Starting with smaller ecosystems gives you room to learn without facing venture-backed competition.

    Remote Work Explosion: The shift to remote work has created new opportunities for plugin developers, productivity tool creators, and niche service providers—perfect Step 1 opportunities.

    The Psychological Advantage

    Beyond the practical benefits, the stair-step method offers something crucial: sustainable motivation. Each step provides its own reward cycle, preventing the burnout that comes from spending years building something with no revenue.

    There’s also the compound effect of skills and network. Your WordPress plugin customers become your SaaS beta testers. Your first product’s revenue funds your second product’s development. Your early marketing experiments teach you what works before the stakes get high.

    Where the Framework Shows Its Age

    While Walling’s core insights remain sound, the tactical landscape has shifted significantly since 2015:

    App Store Dynamics: Both Apple’s App Store and Google Play have become increasingly difficult for indie developers to break through. The “built-in discovery” advantage has diminished.

    WordPress Ecosystem Changes: The WordPress plugin ecosystem has matured, with many niches now dominated by established players. New entrants need more sophisticated marketing approaches.

    No-Code Movement: The rise of no-code tools like Bubble, Webflow, and Airtable has democratized product creation, but it’s also lowered barriers to entry, increasing competition in previously accessible niches.

    Creator Economy: The explosion of content creators has opened new Step 1 opportunities (courses, communities, digital products) that weren’t as viable in 2015.

    The Modern Adaptation

    Smart bootstrappers today are adapting Walling’s framework for current realities:

    Step 1 Evolution: Instead of just plugins, consider micro-SaaS tools, Notion templates, Figma plugins, or niche communities. The principle remains the same—start where there’s built-in distribution and lower complexity.

    Step 2 Acceleration: Modern tools allow faster iteration and testing. You can potentially move through Step 2 more quickly, but the temptation to skip it entirely is stronger and more dangerous.

    Step 3 Sophistication: Today’s SaaS market demands more sophisticated products from day one. The skills you build in Steps 1 and 2 are even more critical for competing effectively.

    The Unsexy Truth About Sustainable Success

    Walling’s stair-step method isn’t sexy, and that’s precisely why it works. In a world obsessed with overnight success and hockey stick growth, it offers something more valuable: a reliable path to independence.

    The method forces you to confront uncomfortable truths about building businesses:

    • Most “revolutionary” ideas fail because they’re too complex for first-time founders
    • Marketing skills matter more than product brilliance
    • Financial runway bought with small wins is more valuable than venture capital
    • Sustainable growth beats explosive growth that can’t be maintained

    Your Next Step

    If you’re reading this with a half-built SaaS product that’s been “90% complete” for six months, consider this your permission to step back. That idea will still be there after you’ve built the skills and resources to execute it properly.

    Instead, ask yourself: What’s the simplest product you could build and sell in the next 90 days? What existing ecosystem could you serve? What problem could you solve with a $29 plugin instead of a $99/month SaaS?

    The founders who follow Walling’s stair-step method might not get the flashy headlines, but they’re building something more valuable: businesses that actually work, income that actually replaces their jobs, and the freedom to pursue bigger opportunities from a position of strength.

    The stairs aren’t glamorous, but they’re the most reliable way to reach the top.


    Rob Walling’s original essay on the stair-step method remains one of the most practical pieces of bootstrap advice ever written. You can read it in full at robwalling.com. For more insights on sustainable bootstrapping, follow his work at MicroConf and the Startups for the Rest of Us podcast.

  • Cursor: How to Increase Chat Font Size – Complete Guide

    Cursor: How to Increase Chat Font Size – Complete Guide

    Cursor’s default chat font size can be difficult to read, especially during long coding sessions. This guide shows you how to increase both the AI response text and your input prompt text in two simple steps.

    What You’ll Need to Do

    1. Adjust Cursor’s built-in font settings – increases AI response text size
    2. Install Custom UI Style Extension – increases your input prompt text size

    cursor-increase-font-size-chat

    Step 1: Increase the Font Size of the Cursor Chat AI Response

    1. Open Settings: Press Ctrl/Cmd + Shift + J or simply click the gear icon in the top right corner
    2. Navigate to Features: Click the “Features” tab
    3. Find Chat Section: Locate the “Chat” section
    4. Adjust Font Size: Increase the font size value to make AI responses larger
    cursor-increase-font-size-chat

    This setting only affects the AI’s responses, not your input text (unless Cursor finally updated this feature). In you want to increase the size of the input prompts too, please read on.

    Step 2: Increase the Font Size of the Cursor Chat Input Prompt

    To avoid having the input text very small compared to the overall Cursor Chat, you need to install the Custom UI Style Extension and configure it, which is very easy to do. So, to increase the font size of the input text in Cursor you need to:

    Install the Extension

    1. Open the Extensions tab in Cursor
    2. Search for “Custom UI”
    3. Install and enable “Custom UI Style”
    cursor-how-to-increase-font-size-of-chat-window

    Configure the Extension

    1. Open settings with Ctrl + , (Ctrl + comma)
    2. Go to Text EditorFont
    3. Click Edit in settings.json
    cursor-increase-font-size-chat

    Add the Json Configuration to Cursor

    Important: Don’t delete your existing settings. Add this configuration as a new key-value pair in your existing JSON structure.

    "custom-ui-style.stylesheet": {
    ".anysphere-markdown-container-root": "font-size: 15px; line-height: 1.3;",
    // Adjust Chat UI Code block 
    ".markdown-block-code *": "font-size: 15px !important; line-height: 1.3;",
    // Adjust Chat Font
    ".aislash-editor-input": "font-size: 15px !important; line-height: 1.3 !important;",
    ".aislash-editor-input-readonly": "font-size: 15px !important; line-height: 1.3 !important;",
    ".aislash-editor-placeholder": "font-size: 15px !important; line-height: 1.3 !important;",
    // Others
    ".anysphere.cursor-retrieval": "font-size: 14px !important; line-height: 1.3 !important;",
    ".aiEditorBox-anysphere": "font-size: 14px !important; line-height: 1.3 !important;",
    ".aichat-code-block-anysphere": "font-size: 14px !important; line-height: 1.3 !important;",
    ".composer-code-block-anysphere": "font-size: 14px !important; line-height: 1.3 !important;",
    ".aicmdk-context-code-block-anysphere": "font-size: 14px !important; line-height: 1.3 !important;",
    // Diff editors in right panel
    ".monaco-diff-editor .monaco-editor .view-lines": "font-size: 14px !important; line-height: 1.3 !important;",
    ".monaco-diff-editor .monaco-editor .view-overlays": "font-size: 14px !important; line-height: 1.3 !important;",
    // Side panel Monaco editors
    ".monaco-mouse-cursor-text *": "font-size: 14px !important; line-height: 1.3 !important;",
    ".composer-message-codeblock .monaco-editor .view-lines": "font-size: 14px !important; line-height: 1.3 !important;",
    ".composer-message-codeblock .monaco-editor .view-overlays": "font-size: 14px !important; line-height: 1.3 !important;"
    }

    • Save the file (Ctrl + S)
    • Close settings and restart Cursor
    • Click “YES” when prompted to apply the configuration
    cursor-increase-font-size-chat
    cursor-increase-font-size-chat

    What This Configuration Does

    This custom UI stylesheet configuration for Cursor adjusts the font sizes and line heights throughout the interface making Cursor more readable and usable

    • Font size: Sets 15px for most interface elements
    • Line height: Uses 1.3 for better readability
    • Code blocks: Uses 14px for optimal code viewing
    • Coverage: Styles chat interface, input areas, code blocks, retrieval panels, and diff editors

    Final Step

    Restart Cursor when prompted to apply all changes. Your chat will now have consistent, readable font sizes throughout the interface.

    Troubleshooting

    • If changes don’t appear, verify the JSON syntax is correct
    • Ensure you saved the settings.json file
    • Restart Cursor completely if the extension doesn’t take effect immediately
    • If you are prompted to apply the configuration or restart the app by the Custom UI Style extension say yes and apply the changes or restart the app

    If you know friends and colleagues who use Cursor and you think they may struggle with small text too, please send this article to them, they’ll surely thank you for the improved readability!

  • How To Automatically Open External Links in a New Tab on WordPress Sites

    How To Automatically Open External Links in a New Tab on WordPress Sites

    This guide will tell you exactly how to set external links to open in a new tab on your WordPress site. You can do that for individual links or set your website to automatically open external links in new tabs across the whole site.

    You’ve invested time and effort into creating valuable content for your WordPress website. When a visitor clicks a link to an external resource, you don’t want them to leave your site behind.

    By default, these links open in the same browser tab, replacing your content and potentially ending the user’s session prematurely.

    This can negatively impact key metrics like bounce rate and session duration.

    The solution is to configure all external links to open in a new browser tab. This simple change improves the user experience by allowing visitors to explore other sites without losing their place on yours.

    This guide will walk you through the primary methods to achieve this, from manual adjustments to fully automated solutions.

    Method 1: The Manual Process (Step-by-Step Examples)

    This method is built directly into WordPress and is ideal for manually setting individual links as you create content.

    Example Using the Block Editor (Gutenberg)

    If you use the modern WordPress block editor, follow these steps:

    1. Highlight Text: In your post or page, select the text you wish to turn into a link.
    2. Click the Link Icon: A small toolbar will appear above the text. Click the chain-link icon.
    3. Enter the URL: Paste the external website address into the box and press the “Submit” arrow (or Enter key).
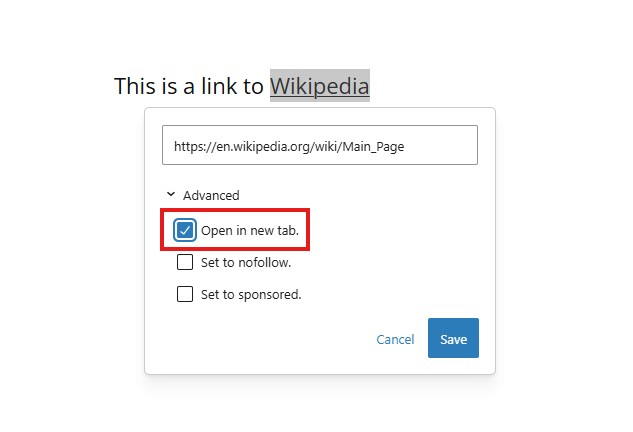
    4. Enable “Open in new tab”: With the link now created, click on it again to bring up the link toolbar. You will see a toggle switch labeled “Open in new tab.” Click to enable it.
    wordpress-links-open-in-new-tab-automatically

    Your link is now set to open in a new tab.

    Example Using the Classic Editor

    If you are using the older Classic Editor, the process is slightly different:

    1. Highlight Text: Select the text you want to link.
    2. Click the Link Icon: In the editor’s toolbar, click the “Insert/edit link” icon.
    3. Access Link Options: A popup box will appear. Paste your URL, then click the gear icon to open the “Link options.”
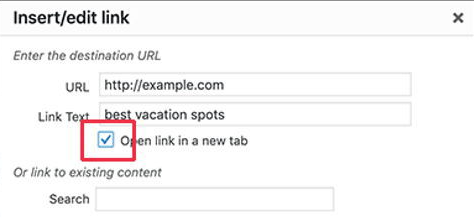
    4. Check the Box: In the advanced options, find and check the box for “Open link in a new tab.”
    5. Add Link: Click the “Add Link” button to apply your changes.

    Method 2: Using WordPress Plugins

    For a site-wide, automated solution, plugins are an excellent choice. They handle all external links—past, present, and future—without requiring manual intervention for each one. Here are some popular plugins that offer this functionality.

    • WP External Links: A comprehensive tool that provides extensive control over all external and internal links. You can set links to open in a new tab, add nofollow or noopener attributes, set link icons, and more.
    • External Links in New Window / New Tab: A lightweight and straightforward plugin. Once activated, it uses JavaScript to make all external links on your site open in a new tab automatically.
    • Rank Math SEO: Many all-in-one SEO plugins include this feature. Rank Math, for example, has a setting in its “General Settings” to open all external links in a new tab, combining SEO management with this useful UX feature.

    Method 3: The Automated Code Solution with WPCode

    For those who want to avoid adding another full-featured plugin, using a code snippets manager like WPCode is the perfect middle ground. It’s a safe and easy way to add functionality with simple code, and it even comes with a pre-built solution for this exact task.

    First, install and activate the free WPCode plugin from the WordPress repository.

    Option A: Use the Built-in WPCode Library Snippet

    WPCode includes a library of ready-to-use snippets. The easiest way to accomplish our goal is to activate the one made for it.

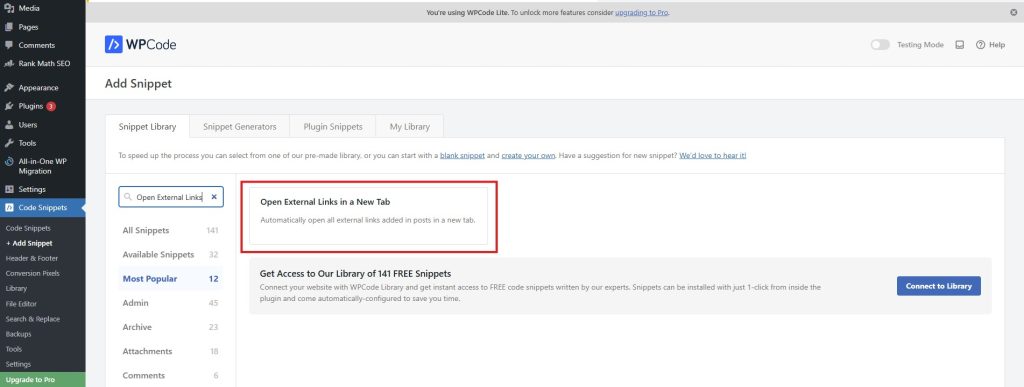
    1. From your WordPress dashboard, navigate to Code Snippets > Library.
    2. Find the snippet titled “Open External Links in a New Tab.”
    3. This code snippet enhances a WordPress website by automatically opening external links in new tabs. When applied, the script runs after the page has loaded, identifying all hyperlinks within the content. If a link’s destination differs from the current page’s hostname, it modifies the link attributes to ensure it opens in a new browser tab, enhancing the user experience. This functionality improves website navigation by providing a seamless transition for visitors accessing external resources, contributing to a more user-friendly browsing environment.
    4. Simply click the “Use snippet” button, and on the next screen, toggle the switch to “Active” and click “Update.”

    That’s it! The functionality is now active across your entire site.

    Option B: Create a Custom Snippet Manually

    If you prefer to create the snippet yourself, WPCode makes that easy too.

    Go to Code Snippets > + Add Snippet.

    Select “Add Your Custom Code (New Snippet).”

    wordpress-links-open-in-new-tab-automatically

    Add a Title: Name your snippet something clear, like “Custom – Open External Links in New Tab.”

    Set Code Type: In the “Code Preview” section, select “PHP Snippet” from the dropdown menu.

    Paste the Code: Copy and paste the following PHP code into the code box, which you can also find on the official WPCode Library here.

    function open_external_URL_in_a_new_tab() {
        ?>
        <script>
            document.addEventListener('DOMContentLoaded', function () {
                var links = document.querySelectorAll('a');
                links.forEach(function (link) {
                    var url = link.getAttribute('href');
                    var parsedUrl = new URL(url, window.location.href);
                    if (parsedUrl.hostname !== window.location.hostname) {
                        link.setAttribute('target', '_blank');
                        link.setAttribute('rel', 'noopener noreferrer');
                    }
                });
            });
        </script>
        <?php
    }
    add_action('wp_footer', 'open_external_URL_in_a_new_tab');
    wordpress-links-open-in-new-tab-automatically

    Choose Insertion Location: Scroll down to the “Insertion” section. Leave the location as “Site Wide Footer” to ensure it runs on every page.

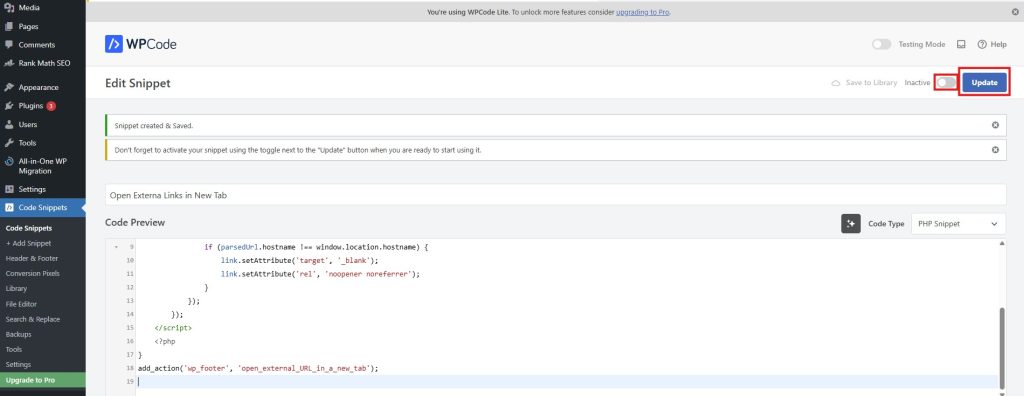
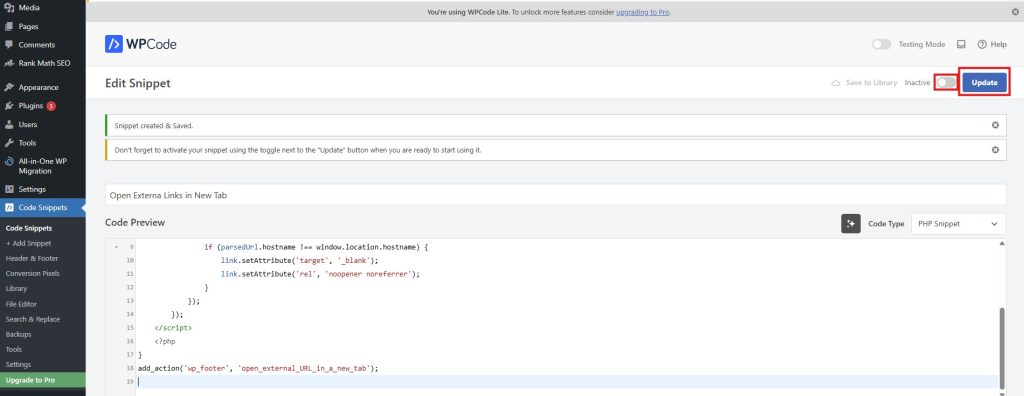
    Activate: Toggle the snippet to “Active” at the top of the page and click “Save Snippet.”

    wordpress-links-open-in-new-tab-automatically

    Method 4: How to Handle Navigation Menu Links

    The methods above generally apply to links within your content, but not your navigation menus. WordPress has a separate, built-in setting for this.

    1. In your dashboard, go to Appearance > Menus.
    2. At the top-right corner of the screen, click the “Screen Options” tab.
    3. A panel will slide down. Under “Show advanced menu properties,” check the box for “Link Target.”
    4. Close the Screen Options panel. Now, when you expand any item in your menu structure, you will see a new checkbox: “Open link in a new tab.”
    5. Check this box for any external links in your menu.
    6. Click “Save Menu.”

    Conclusion

    Controlling how links behave on your website is a small but impactful way to improve user experience and keep visitors engaged. Whether you prefer a quick manual fix, a dedicated plugin, or a lightweight code snippet, you now have a complete set of options to ensure your external links always open in a new tab. Choose the method that best fits your workflow and technical comfort level.


    Frequently Asked Questions (FAQ)

    Q1: Is opening external links in a new tab bad for accessibility?
    It can be, as it may disorient users who rely on screen readers or have cognitive disabilities. However, it has become a widely accepted web convention. The key is consistency. If you choose to do it, apply it to all external links so the behavior is predictable for your users.

    Q2: What does rel=”noopener noreferrer” do?
    This is a security attribute. noopener prevents the newly opened tab from being able to control the original tab via JavaScript. noreferrer prevents the new site from seeing your page as the source of the traffic. The code snippets provided include this for best practice.

    Q3: Will these methods slow down my website?
    The manual and menu methods have zero performance impact. The JavaScript/WPCode solution is extremely lightweight and runs after the page loads, so its impact on perceived speed is negligible. A well-coded plugin should also have a minimal performance footprint.

  • How To Safely Add a Custom Code Snippet in WordPress Using WPCode Plugin (Easy and Free)

    How To Safely Add a Custom Code Snippet in WordPress Using WPCode Plugin (Easy and Free)

    So, you need to add a custom code snippet to your WordPress site. Maybe it’s a Google Analytics tracking code, a Facebook Pixel, or a custom PHP function to add a new feature. A quick search might tell you to edit your theme’s functions.php file.

    Stop right there.

    Directly editing your theme files and the functions.php is one of the riskiest things you can do.

    A single misplaced comma or typo can cause the infamous “white screen of death,” locking you out of your site. Even if you get it right, your custom code will be erased the next time you update your theme.

    Thankfully, there’s a much safer, easier, and more professional way. This guide will give you a step-by-step walkthrough on how to safely add any custom code snippet in WordPress using the free and incredibly popular WPCode plugin.

    add-wordpress-snippet-wpcode

    Why You Shouldn’t Edit Your Theme’s functions.php File

    Before we dive into the solution, it’s important to understand the problem. Here’s why using the Theme File Editor is a bad idea for beginners and pros alike:

    • High Risk of Errors: A small syntax error in your functions.php file can take your entire website offline.
    • Changes Are Temporary: When you update your WordPress theme (which you should do for security reasons), the functions.php file is overwritten, and all your custom code is permanently deleted.
    • No Organization: Over time, as you add more snippets, your functions.php file becomes a disorganized mess, making it impossible to track what code does what.

    Introducing WPCode: Your Safe Container for Code Snippets

    The WPCode plugin is the perfect solution to all these problems. Think of it as a safe, organized container for all your custom code that lives independently from your theme.

    With over 2 million active installations, it’s the most trusted tool for the job because it allows you to:

    • Add code without fear of breaking your site.
    • Keep your snippets even when you switch or update your theme.
    • Organize and label every snippet so you know exactly what it does.
    • Load code only on specific pages to keep your site fast.

    How to Install the Free WPCode Plugin

    First things first, let’s get the plugin installed on your site.

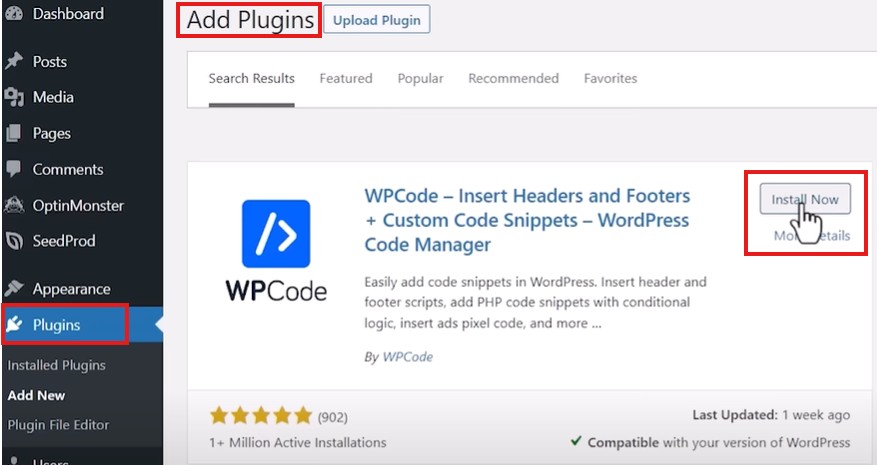
    1. Log in to your WordPress dashboard.
    2. Navigate to Plugins > Add New.
    3. In the search bar, type “WPCode“.
    4. Find the plugin named “WPCode – Insert Headers and Footers + Custom Code Snippets” and click Install Now.
    5. After installation, click Activate.
    wpcode-insert-header-and-footer-wordpress

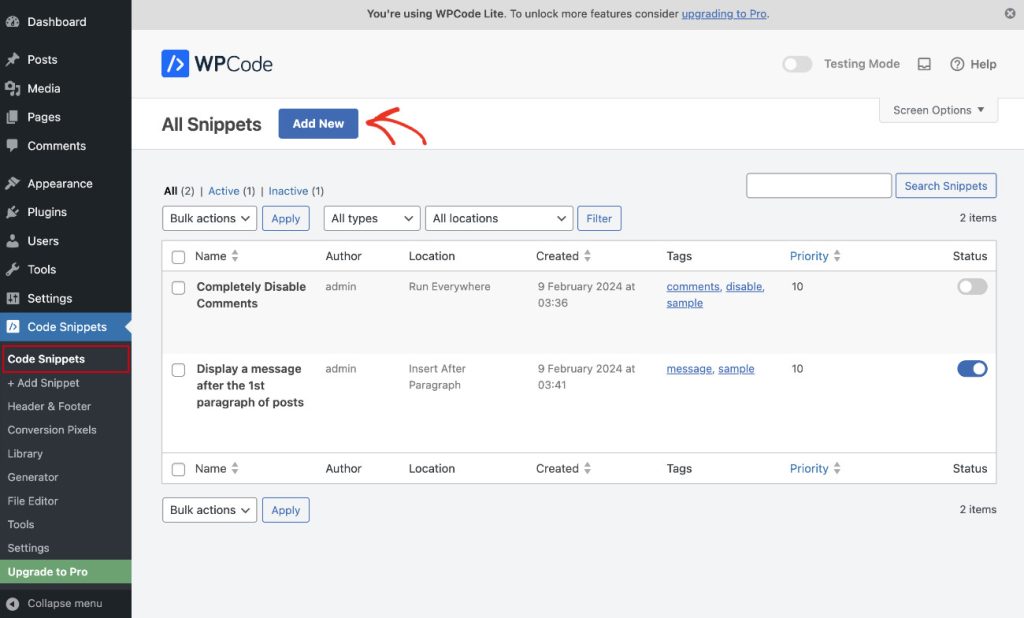
    You’ll now see a new Code Snippets menu item on the left side of your dashboard. This is your new command center for all things code-related.

    add-custom-code-snippet-wordpress-wpcode

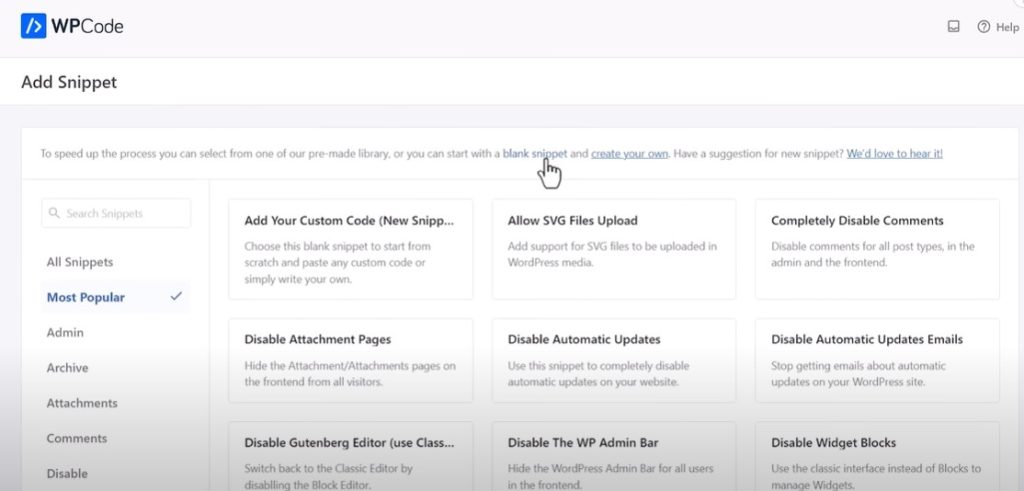
    When you click on Code Snippets in the left sidebar, you’ll access the WPCode dashboard where you have two main options: create custom snippets from scratch or browse through a curated library of professionally-coded snippets from experienced WordPress developers.

    add-custom-code-snippet-wordpress-wpcode

    How to Add Code Snippets to Your Entire WordPress Site

    For scripts that need to run site-wide—like Google Analytics tracking codes, Facebook Pixels, or any other universal tracking scripts—WPCode offers the simplest possible approach. This method is perfect when you need consistent functionality across every page of your website.

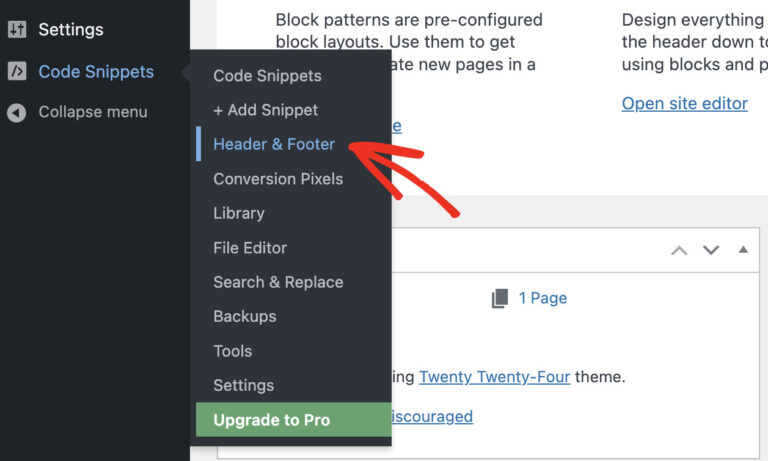
    From your WordPress dashboard, navigate to Code Snippets > Header & Footer. This dedicated section is specifically designed for global code insertion, making it incredibly straightforward to add scripts that should load on every page.

    code-snippet-across-all-site-wordpress-header

    Step 2: Choose Your Insertion Location

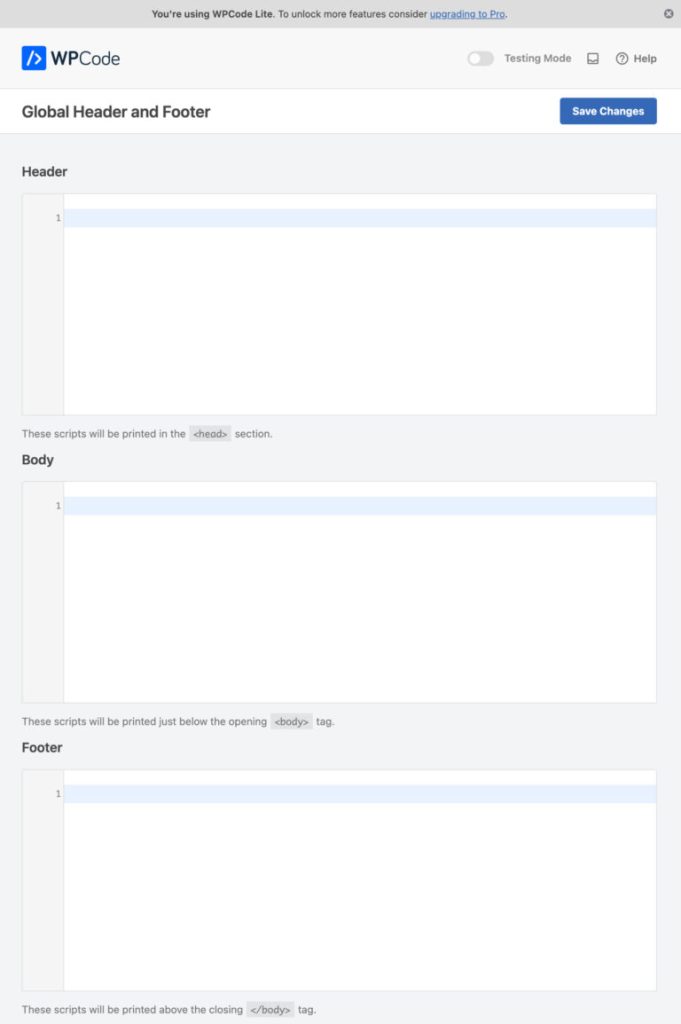
    WPCode presents you with three strategically placed input areas: HeaderBody, and Footer. Each serves a specific purpose in your website’s loading sequence.

    wpcode-insert-custom-snippet-header-footer-body

    Step 3: Add Your Code to the Appropriate Section

    Simply paste your script into the box that matches your requirements:

    • Header Section: Code placed here gets inserted into your site’s <head> section. This is ideal for verification codes, meta tags, or scripts that absolutely must load before any content appears.
    • Body Section: Scripts here are inserted immediately after the opening <body> tag. This location is less commonly used but can be perfect for certain tracking pixels or initialization scripts.
    • Footer Section: Code here loads just before the closing </body> tag. This is the recommended location for most scripts (especially analytics codes like Google Analytics) because it ensures your content loads first, creating a better user experience and faster perceived loading times.

    Step 4: Save and Activate

    Once you’ve added your code, click the Save Changes button to store your snippets securely in your WordPress database.

    wpcode-activate-snippet

    Congratulations! Your code is now safely running across your entire website, and you can rest assured it will continue working even if you change themes or update WordPress.

    Important Things to Remember

    Before we move on, here are some key points to keep in mind for ongoing success:

    • Easy Management: You can edit or remove any code snippets whenever needed through the same interface.
    • Plugin Dependency: WPCode must remain installed and active for your custom code to continue functioning.
    • Data Persistence: Even if the plugin is temporarily deactivated, your code remains securely stored in your WordPress database. Simply reactivating the plugin will restore all functionality.
    • Cache Considerations: If you’re using a caching plugin (which you should be!), remember to clear your WordPress cache after making changes to ensure your updates appear correctly.

    How To Add Scripts To Specific Pages In WordPress

    Sometimes you need surgical precision with your code placement. Why load a contact form script on every blog page? Or analytics tracking for a specific landing page campaign across your entire site? You don’t have to.

    This is where WPCode truly shines—with its Smart Conditional Logic, you can target exactly where your scripts run. This targeted approach isn’t just about organization; it’s about performance. Loading scripts only where they’re needed keeps your site fast and your visitors happy.

    WPCode supports various types of scripts, including JavaScript, HTML, CSS, and PHP, providing a versatile solution for customizing your website. With over 2 million websites trusting WPCode to run their business, you can be confident you’re using a battle-tested solution that automates everything for you.

    Here’s how to harness this power using WPCode’s Smart Conditional Logic.

    Step 1: Create a New Custom Snippet

    Instead of using the global Header & Footer section, we’ll create a targeted, individual snippet that gives us complete control over where it loads.

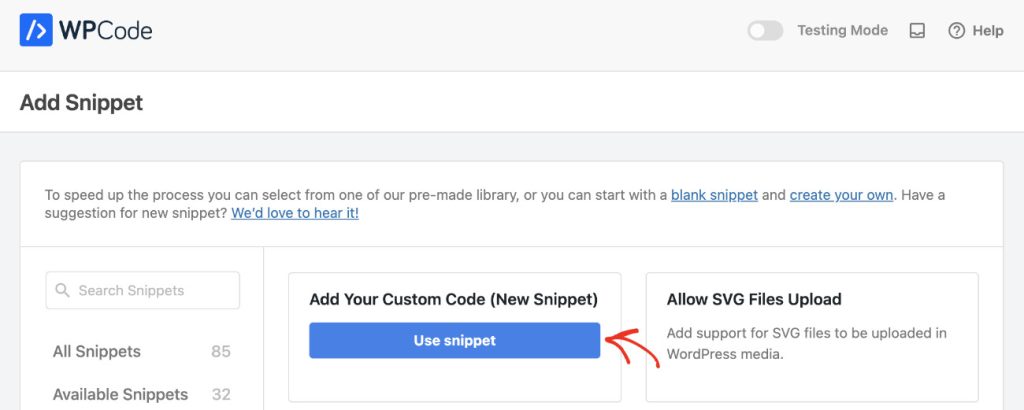
    1. Navigate to Code Snippets > + Add Snippet.
    2. Find “Add Your Custom Code (New Snippet)” and click Use Snippet.
    WPCode Plugin Dashboard
    add-custom-code-snippet-in-specific-wordpress-pages

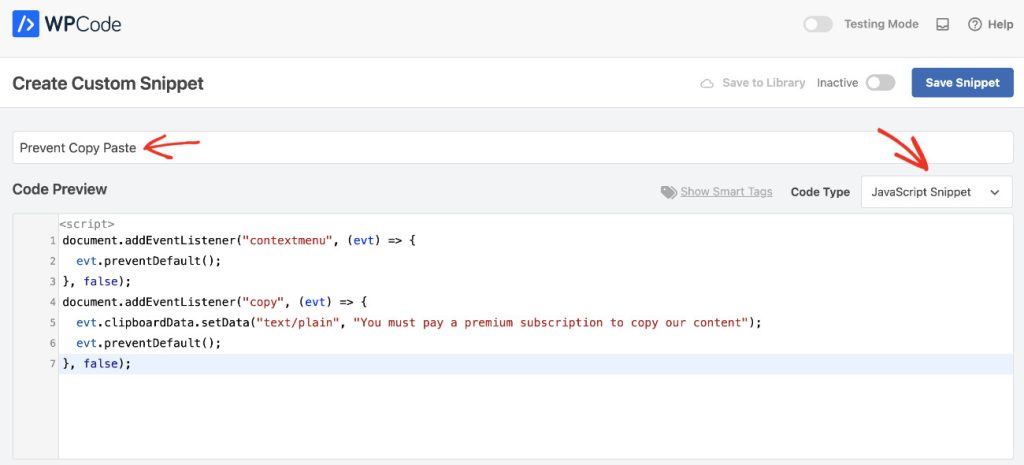
    Step 2: Configure Your Snippet Details

    This is where you set up the foundation of your targeted script.

    1. Add a Descriptive Title: Give your snippet a clear, memorable name like “Thank You Page Conversion Script” or “Product Page Analytics Tracker”. Future you will thank you for this clarity.
    2. Choose the Code Type: Select the appropriate type from the dropdown—typically JavaScript Snippet for tracking codes or HTML Snippet for embedded content.
    3. Add Your Script: Paste your code into the main “Code Preview” area.
    add-custom-code-in-specific-wordpress-pages-posts

    Step 3: Set Up Smart Conditional Logic

    Here’s where the magic happens—you’ll tell WPCode exactly which pages should load your script.

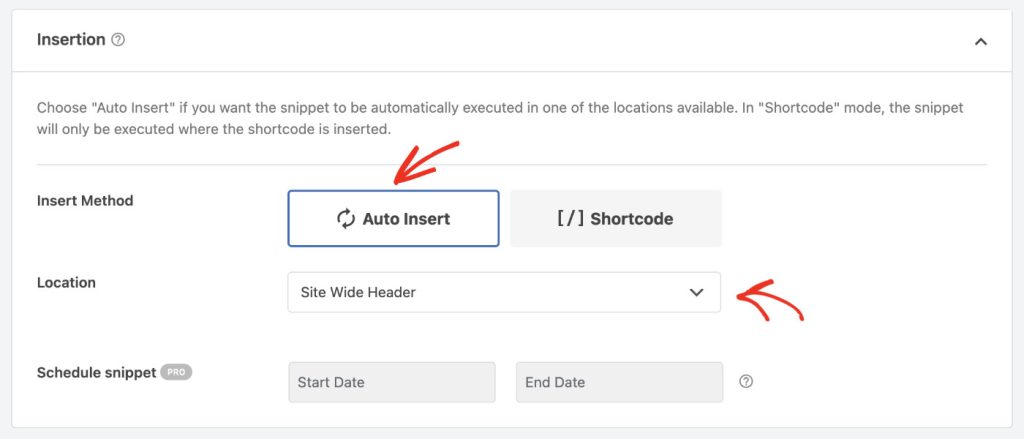
    1. In the Insertion section, keep the method as Auto Insert and the Location as Site Wide Header (or your preferred location). Don’t worry—our conditional logic will override this broad setting.
    add-custom-code-snippet-wordpress-on-single-pages

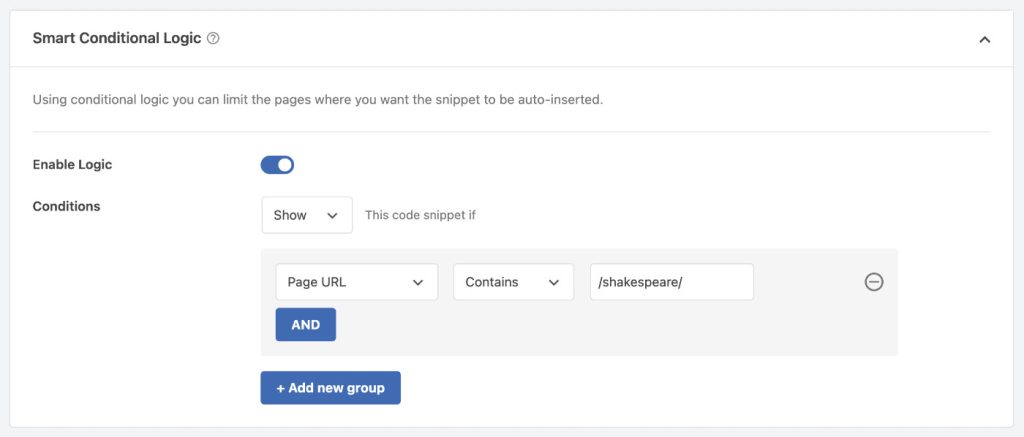
    1. Scroll down to the Smart Conditional Logic section and toggle Enable Logic on.
    add-custom-code-snippet-wordpress-wpcode-conditional-logic

    1. Click + Add New Group to create your first targeting rule.
    2. For page-specific targeting, configure your rule like this:
      • First dropdown: Select Page URL
      • Second dropdown: Choose Contains (more flexible) or Is (exact match)
      • Third field: Enter your page identifier. For example:
        • Use /thank-you/ to target any page with “thank-you” in the URL
        • Use the complete URL https://yourwebsite.com/thank-you for exact matching
        • Include forward slashes before and after the page slug for better precision
    3. Pro Tip: You can create multiple rules to target different pages, post types, user roles, device types, and much more. WPCode’s conditional logic is incredibly powerful.

    Step 4: Activate and Deploy Your Snippet

    1. At the top of the page, toggle the switch from Inactive to Active.
    2. Click Save Snippet to deploy your targeted code.
    add-custom-code-snippet-wordpress-wpcode

    Your script is now live and will load only on the pages you’ve specified, keeping the rest of your site lean and fast.

    For more information, please check out the official documentation and tutorial by WPCode.

    Important Considerations

    URL Changes: Keep in mind that if you change a page’s slug or URL structure, you’ll need to update your snippet conditions accordingly. While this is a minor maintenance task, it’s something to remember when reorganizing your site.

    Alternative Targeting Methods: WPCode offers several other targeting options beyond URL matching, including targeting by post ID, post type, user role, and device type. These methods can be more reliable for certain use cases and don’t depend on URL structure.

    Take Control of Your WordPress Site

    By using WPCode, you’ve empowered yourself to add custom functionality to WordPress the right way—safely, cleanly, and with complete control. You no longer have to risk breaking your site or losing your work.

    Install WPCode today and start unlocking the full potential of your WordPress website

  • The Rise of Low-Code Development Platforms: Empowering Citizen Developers

    The Rise of Low-Code Development Platforms: Empowering Citizen Developers

    In recent years, the landscape of software development has been undergoing a significant transformation. One of the most notable trends is the rise of low-code development platforms. These platforms are democratizing the process of software creation, enabling individuals with little to no coding experience to build functional applications. This shift is not only accelerating digital transformation but also empowering a new wave of “citizen developers.”

    What Are Low-Code Development Platforms?

    Low-code development platforms are software tools that allow users to create applications through graphical user interfaces and configuration instead of traditional hand-coded programming. These platforms provide a visual approach to software development, using drag-and-drop components and model-driven logic. This approach significantly reduces the amount of manual coding required, making it easier and faster to develop applications.

    Benefits of Low-Code Development

    1. Speed and Efficiency: One of the primary advantages of low-code platforms is the speed at which applications can be developed and deployed. Traditional software development can be time-consuming, requiring extensive coding, testing, and debugging. Low-code platforms streamline this process, enabling rapid prototyping and iteration.
    2. Accessibility: Low-code platforms lower the barrier to entry for software development. Citizen developers—individuals who are not professional developers but have a good understanding of business processes—can create applications tailored to their specific needs. This accessibility fosters innovation and allows for more customized solutions.
    3. Cost-Effectiveness: By reducing the need for specialized coding skills, low-code platforms can lower development costs. Businesses can leverage existing talent within their organizations to build applications, reducing the reliance on expensive external developers.
    4. Flexibility and Scalability: Low-code platforms offer a high degree of flexibility, allowing users to create a wide range of applications, from simple mobile apps to complex enterprise systems. Additionally, these platforms often come with built-in scalability features, making it easier to expand applications as business needs grow.

    Use Cases for Low-Code Development

    1. Business Process Automation: Low-code platforms are ideal for automating repetitive business processes. For example, a company can quickly develop an application to automate invoice processing, reducing manual data entry and minimizing errors.
    2. Customer Relationship Management (CRM): Businesses can use low-code platforms to build custom CRM systems tailored to their unique customer interactions and sales processes. This customization can lead to improved customer satisfaction and more efficient sales operations.
    3. Mobile App Development: With the increasing demand for mobile applications, low-code platforms provide a quick and efficient way to develop and deploy mobile apps. These platforms often include pre-built templates and components, making it easier to create user-friendly mobile interfaces.
    4. Data Management and Analytics: Low-code platforms can be used to build applications for data management and analytics. Businesses can create dashboards and reports to visualize data, enabling better decision-making and strategic planning.

    Challenges and Considerations

    While low-code development platforms offer numerous benefits, there are also challenges and considerations to keep in mind:

    1. Limited Customization: Although low-code platforms provide a high degree of flexibility, they may not offer the same level of customization as traditional coding. Complex or highly specialized applications may still require custom code.
    2. Vendor Lock-In: Many low-code platforms are proprietary, meaning that applications built on these platforms may be difficult to migrate to other systems. Businesses should carefully consider the long-term implications of vendor lock-in.
    3. Security Concerns: As with any software development, security is a critical consideration. Low-code platforms must provide robust security features to protect sensitive data and ensure compliance with regulations.
    4. Integration Challenges: Integrating low-code applications with existing systems and databases can be challenging. Businesses need to ensure that their low-code platforms can seamlessly integrate with their current IT infrastructure.

    The Future of Low-Code Development

    The future of low-code development looks promising. As these platforms continue to evolve, they will likely become even more powerful and versatile. Advances in artificial intelligence and machine learning are expected to further enhance low-code platforms, enabling even greater automation and intelligence in application development.

    Moreover, the growing adoption of low-code platforms is fostering a culture of innovation and collaboration within organizations. By empowering citizen developers, businesses can tap into a broader range of ideas and solutions, driving digital transformation and competitive advantage.

    Conclusion

    Low-code development platforms are revolutionizing the way software applications are created. By making development faster, more accessible, and cost-effective, these platforms are empowering a new generation of developers and driving innovation across industries. While there are challenges to consider, the benefits of low-code development are undeniable. As technology continues to advance, low-code platforms will play an increasingly vital role in shaping the future of software development.